Functional tests On Brewie using the developer mode
The following procedure can be followed before submitting an issue ticket to help Brewie Tech Support in remote error detection.
What is this and how it works?
The test described below is a manually performed functional hardware check procedure that identifies main hardware malfunctions. The steps are built on each other. Each step contains a method to check up on a specific hardware element. In case one step fails, the testing doesn’t stop, the procedure offers a plan B to continue the check.
If an element is found to be faulty, the possible causes and the solutions of the error are also listed in order of difficulty. An error code is assigned to each part of the machine which means that if the mitigation of the problem involves complex repair works and the whole element has to be replaced, there is a separate step-by-step guide to each error code which describes the replacement works in detail that has to be followed.
Prior to attempting to repair of the machine, always contact Brewie Tech Support and share the results of this functional test.
The following elements will be tested
1. Automatic water inlet
2. Testing the cooling cycle
3. Water circulation on boiling side
4. Water transfer to the mashing tank
5.Water circulation on mashing side
6. Detecting errors on both boiling and mashing sides
6.1 Testing the boiling inlet valve
6.2 Testing the boiling non-return valve
6.3 Testing the mashing inlet valve
6.4 Testing the mashing non-return valve
7. Testing the hop cages
8.Testing the cooling valve
9. Boil heater
10. Mash heater
11. Draining
Steps of the Test
Setting up the machine for testing
Please follow the steps below (as seen in the video especially between 0:07 – 1:20: https://www.youtube.com/watch?v=cqUQPAU7ARs)
- Place the machine on an even surface, make sure that all four legs of the machine stand still.
- Connect the power cable to a power plug.
- Connect the high pressure hose to the water inlet (this is necessary for the automatic water inlet and for the cooling as well)
- The two silicone hoses are to be connected to the two water outlets.
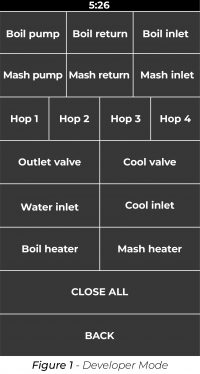
- Enter the Developer Mode by typing: morecontrol in the Recipe search field. After that the special interface appears.
Using this platform all the hardware elements (valves, pumps and the heating plates) can be directly controlled.
IMPORTANT! It is important to remember that this platform has no built-in security routine checks to prevent machine break downs (for example: sensors don’t measure water amount, overflow might occur; there is no water check, the tanks may get burnt etc.)
This is why it is of paramount importance to follow all the steps written in this guide.
1. Automatic water inlet
IMPORTANT! It is important to remember that there are no security features to prevent overflow if the “Water inlet” is not turned off on time!
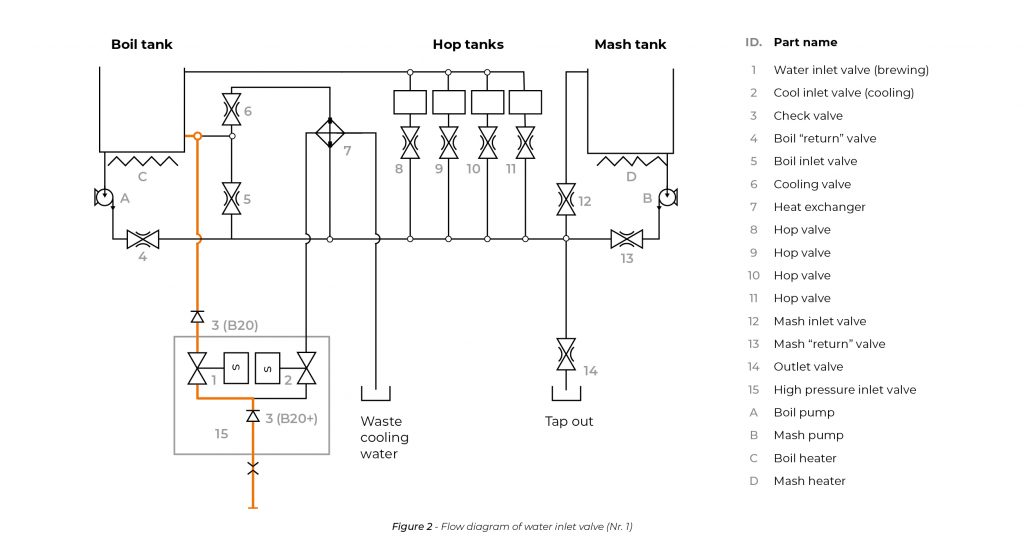
The high-pressure hose is attached to the inlet of the high-pressure valve. This magnetic valve has two outlets. One of them is called the water inlet, the other one is called the cool inlet. This process tests the water inlet valve (Figure 2 – Flow diagram of water inlet valve).
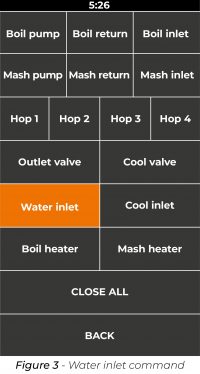
After clicking on the “Water inlet” command (Figure 3 – Water inlet), the machine should start filling water into the boiling tank. To continue testing it is enough to have 7-10 litres (1,8 – 2,6 US gallons) of water in the boil tank.
If the machine fails to fill itself, the following errors have possibly occurred:
- The faucet, to which the machine is connected, is not open. → Check whether the water tap of the domestic system is open or not.
- Cable is not connected properly. → Check the cables of the given valve(s).
- The high-pressure inlet valve is faulty.
If the machine fails to add water automatically, please add it manually, and continue the Test with Step 2.
2. Testing the cooling cycle
This process checks the cooling outlet of the high-pressure valve (Figure 4 – Flow diagram of water inlet valve (Nr. 2)).
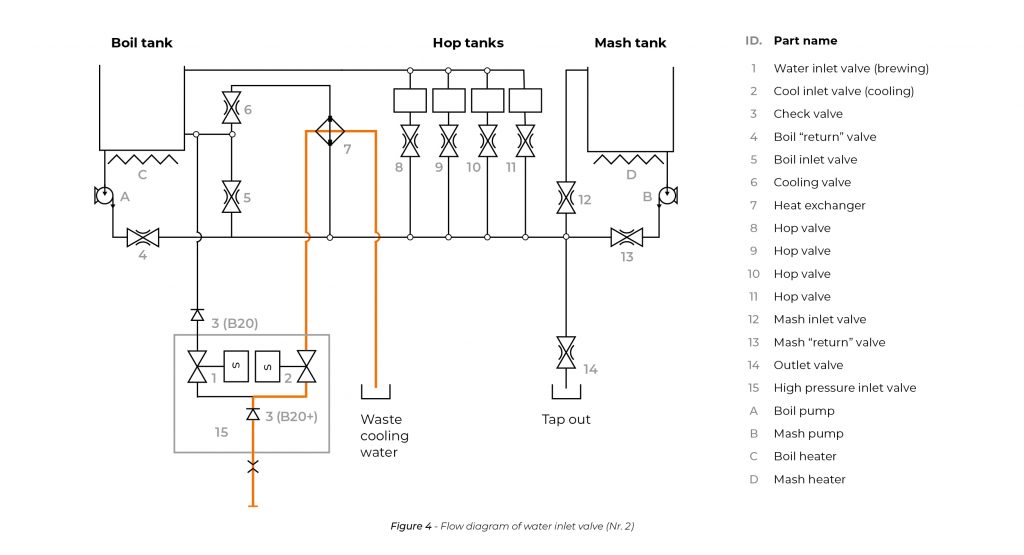
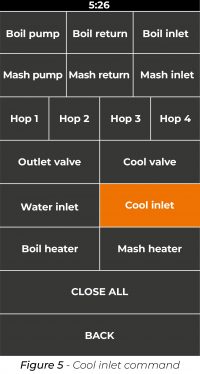
After clicking on the “Cool inlet” command (Figure 5 – Cool inlet), the machine should start circulating water on the water side of the heat exchanger, meaning that water should exit the machine at the inner low-pressure outlet (Figure 6 – Position of water outlet of the heat exchanger).
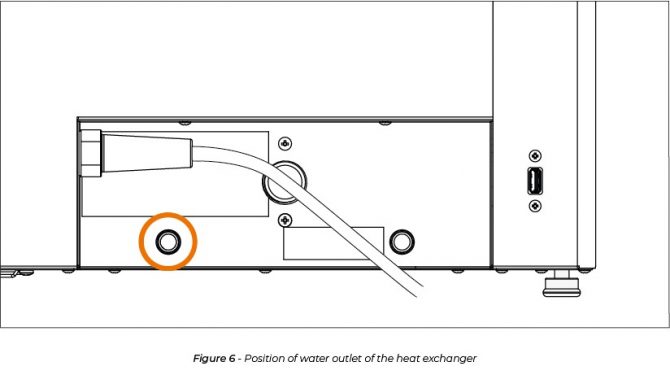
If the water is not flowing out through the inner water outlet, the following errors have possibly occurred:
- The faucet, to which the machine is connected, is not open. → Check whether the water tap of the domestic system is open or not.
- Cable is not connected properly. → Check the cables of the given valve(s).
- The high-pressure inlet valve is faulty.
3. Water circulation on the boiling side
This process checks the water circulation on the boiling side (Figure 7- Flow diagram of water circulation in the boiling tank). The water is recirculated by the boil pump (“A” pump) through the boil return (Nr. 4) and boil inlet (Nr 5) valves back to the boil tank.
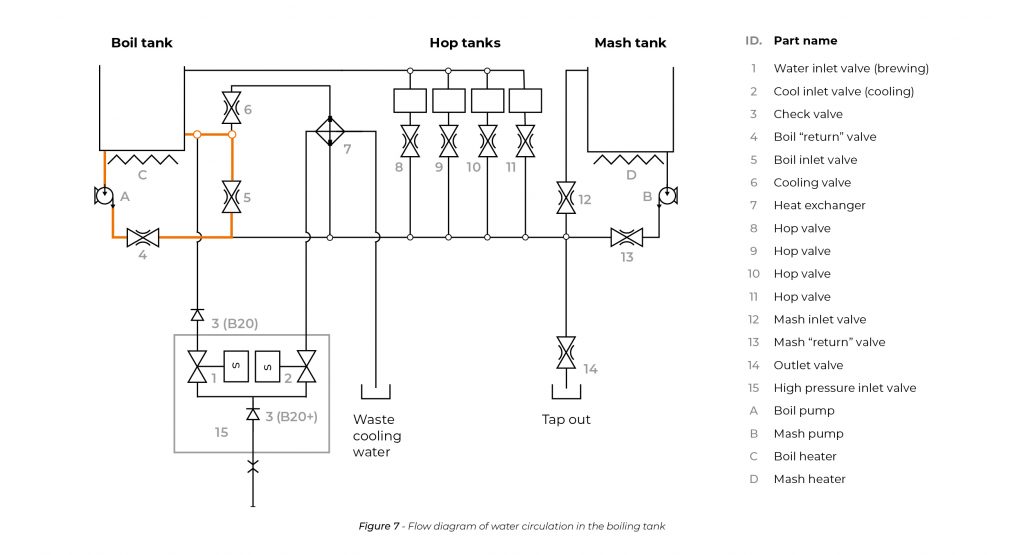
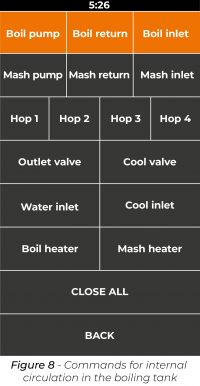
After clicking on the “Boil pump”, “Boil return” and “Boil inlet” commands (Figure 8 – Commands for internal circulation in the boiling tank), the machine should transfer water through the bottom orifice back to the boil tank using its side orifice.
If the water is not being recirculated in the boiling tank, or the circulation is slow, it means that at least one out of the three parts is faulty. The following errors have possibly occurred:
- The inner side of the silicone tube is stuck together. → Use the nasal bulb to pop the tubes out.
- One or both of the valves don’t receive electric power. → Check the cables of the given valve(s).
- One or both of the 2 valves are faulty.
- The boiling pump is clogged.
- The boiling pump doesn’t receive electric power. → Check the cables of the pump.
- The boiling pump is faulty.
If during this step no error occurred, leave out steps Step 7.1 – Testing the boil inlet valve and Step 7.2 – Testing the boili return valve.
If water circulation is absent in the boiling tank, introduce water manually into the mashing tank and continue the test with Step 6. – Water circulation on the mash side.
In case an error occurs, use the second option in Step 8. – Testing the hop and Step 9. – Testing the cool valve. (The alternative version of Step 8. – Testing the hop can be found at the end of that section, and the alternative version of Step 9. – Testing the cool valve can be found at the end of that section.)
4. Mash inlet valve (water transfer from boil tank to mash tank)
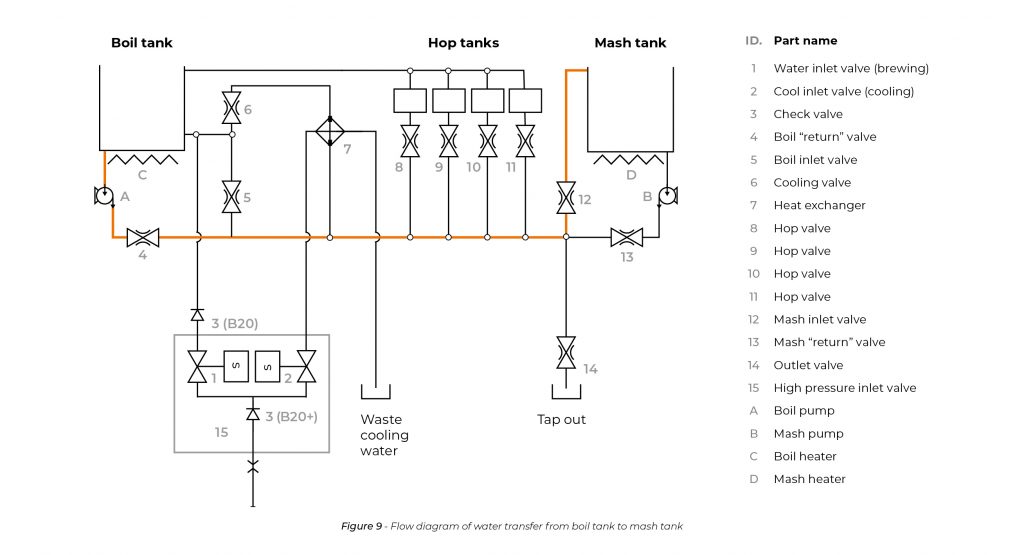
The water is transferred by the boil pump (“A” pump) through the boil return (Nr. 4) and mash inlet (Nr 12) valves to the mash tank (Figure 9 – Flow diagram of water transfer from boil tank to mash tank). This process checks the mash inlet valve (Nr 12).
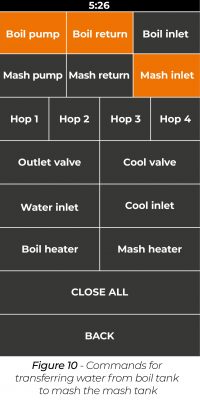
After clicking on the “Boil pump”, “Boil return” and “Mash inlet” commands (Figure 10 – Commands for transferring water from boil tank to mash the mash tank), the machine should transfer water through the bottom orifice of the boil tank to mash tank using its side orifice.
If water is not entering, or entering slowly to the mashing tank, the following errors may have occurred:
- The inner side of the silicone tube is stuck together.
- The inlet valve of the mashing tank doesn’t receive electric power. → Check the cables of the given valve.
- The mashing inlet valve is faulty.
- The inlet valve has been assembled incorrectly.
5. Water circulation on the mash side
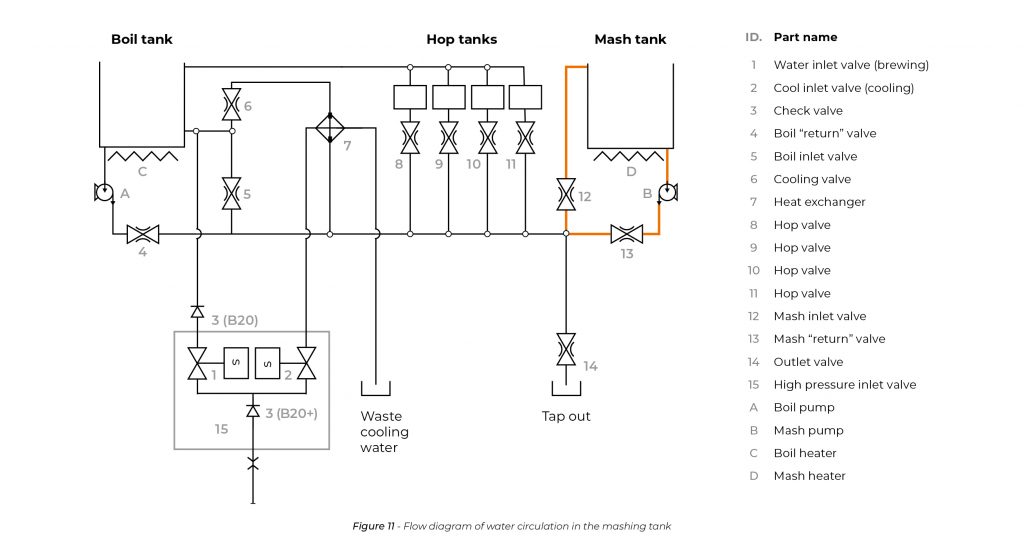
This process checks the water circulation on the mashing side (Figure 11 – Flow diagram of water circulation in the mashing tank). The water is recirculated by the mash pump (“B” pump) through the mash return (Nr. 13) and mash inlet (Nr. 12) valves back to the mash tank.
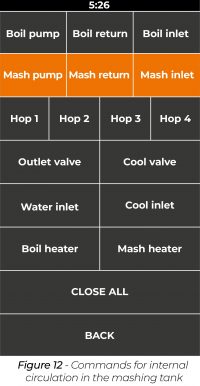
After clicking on the “Mash pump”, “Mash return” and “Mash inlet” commands (Figure 12 – Commands for internal circulation in the mashing tank) the machine should transfer water through the bottom orifice back to the mash tank using its side orifice.
If Step 4. – Water circulation on the boiling side failed, Step 5. – Mash inlet valve (water transfer from boil tank to mash tank) had to be skipped. In this case, first 7-10 litres (1,8 – 2,6 US gallons) of water has to be poured into the mashing tank manually.
If water is not circulating in the mashing tank, or the circulation is slow, the following errors have possibly occurred:
- The inner side of the silicone tube is stuck together.
- The inlet valve of the mashing tank does not receive electric power. → Check the cables of the given valve.
- The mashing non-return valve is faulty.
- The mash pump is clogged.
- The mash pump does not receive electric power. → Check whether the mash pump receives electricity or not.
- The mash pump is faulty.
If water is not circulating neither in the boiling, nor in the mashing tank, complete only Step 10. – The boil heater and Step 11. – The Mash heater., after which based on the “communicating vessels theory” drain the liquid from both tanks.
As soon as the machine is empty, please refer to the document titled “Dismantling the bottom part of the machine”, and check which parts may be faulty, then following the instructions based on the Error code, change those faulty parts for new ones.
If no errors occurred so far, Step 7. – Determining the errors on both boiling and mashing sides can be skipped completely.
6. Determining the errors on both boiling and mashing sides
The purpose of this section is to narrow the circle of possible errors occurred in Step 4. – Water circulation on the boiling side and Step 6. – Water circulation on the mash side.
Only complete sections 6..1 and 6.2, if any errors were encountered in Step 4. – Water circulation on the boiling side.
Only complete sections 6.3 and 6.4, if any errors were encountered in Step 6. – Water circulation on the mash side
6.1. Testing the boil inlet valve
This step checks the boil inlet valve (Figure 13 – Flow diagram for testing the boil inlet valve (Nr. 5)). The water is pumped by the mash pump (“B” pump) through the mash return valve (Nr. 13) to the boil inlet valve (Nr. 5).
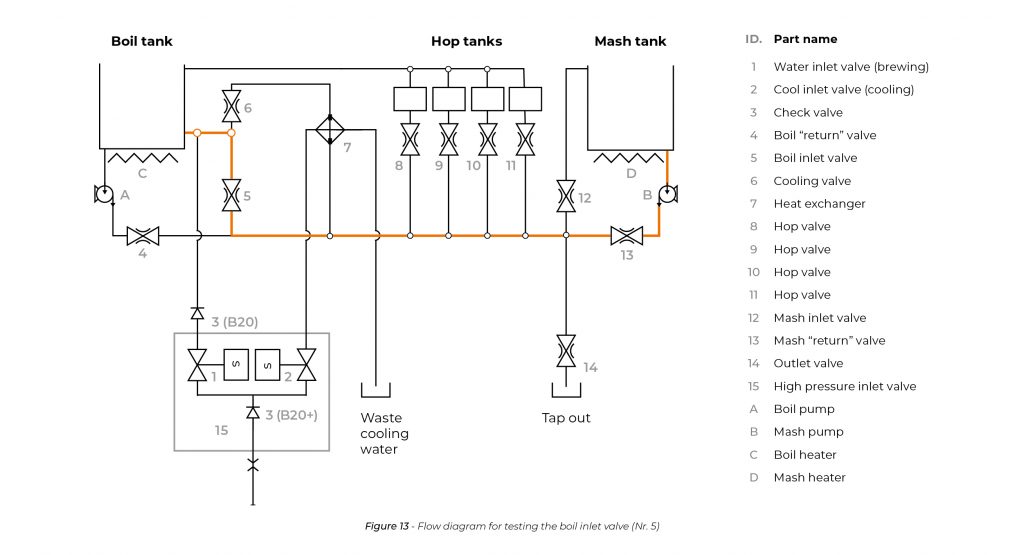
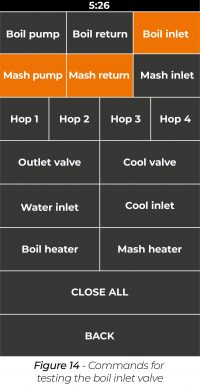
After clicking on the “Mash pump”, “Mash return” and “Boil inlet” commands (Figure 12 – Commands for internal circulation in the mashing tank) the machine should transfer water through the bottom orifice of the mash tank to the boil tank using its side orifice.
If nothing happens, or the water flow is too weak, the following problems could have occurred:
- The inner side of the silicone tube is stuck together.
- The boil inlet valve does not receive electric power. → Check the cables of the given valve.
- The boil inlet valve is faulty.
6.2 - Testing the boil return valve
This step checks the boil return valve (Figure 15 – Flow diagram for testing the boil return valve). The water is pumped by the mash pump (“B” pump) through the mash return valve (Nr. 13) to the boil return valve (Nr. 4) and boil pump (“A” pump).
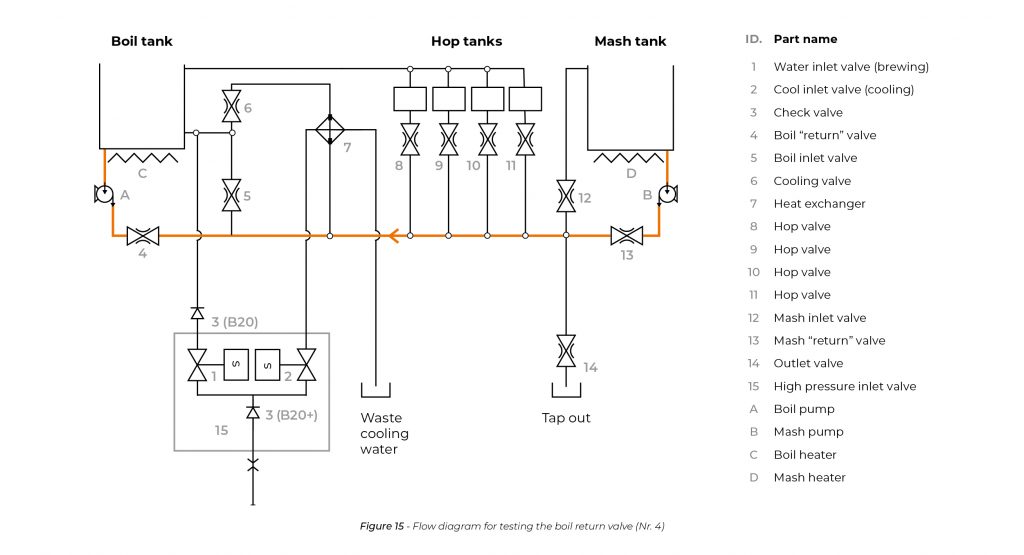
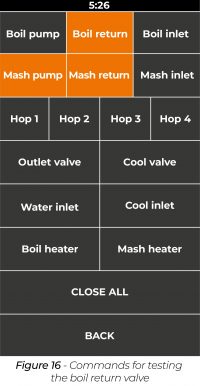
After clicking on the “Mash pump”, “Mash return” and “Boil return” commands (Figure 16 – Commands for testing the boil return valve) the machine should transfer water through the bottom orifice of the mash tank to the boil tank using its bottom orifice.
If nothing happens, or the water flow is too weak, the following problems could have occurred:
- The inner side of the silicone tube is stuck together.
- The boil return valve does not receive electric power. → Check the cables of the given valve.
- The boil return valve is faulty.
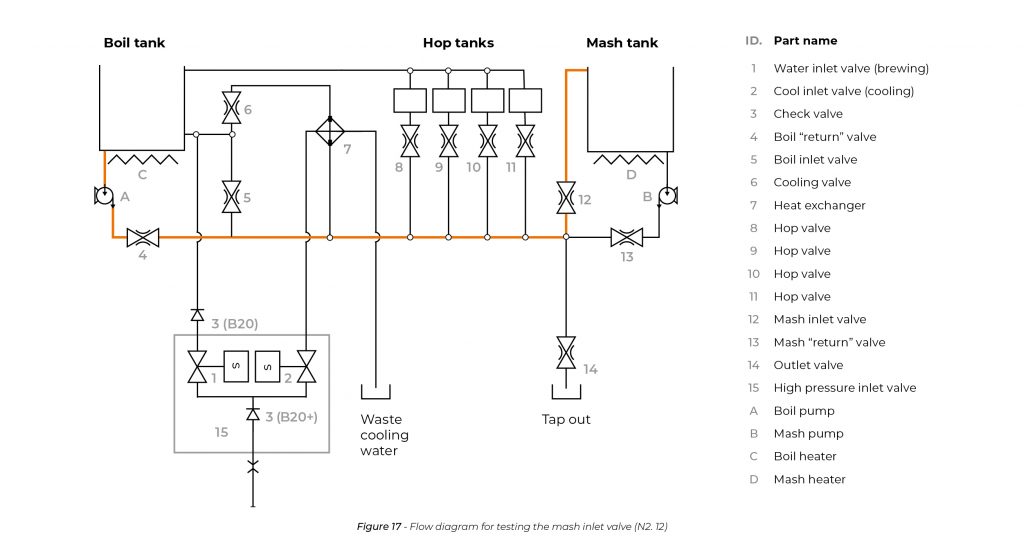
6.3. Testing the mash inlet valve
This step checks the mash inlet valve (Figure 17 – Flow diagram for testing the mash inlet valve). The water is pumped by the boil pump (“A” pump) through the boil return valve (Nr. 4) to the mash inlet valve (Nr. 12).
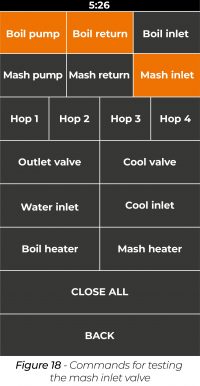
After clicking on the “Boil pump”, “Boil return” and “Mash inlet” commands (Figure 18 – Commands for testing the mash inlet valve) the machine should transfer water through the bottom orifice of the boil tank to the mash tank using its side orifice.
If nothing happens, or the water flow is too weak, the following problems could have occurred:
- The inner side of the silicone tube is stuck together. → Error code: E105
- The mash inlet valve does not receive electric power. → Check the cables of the given valve.
- The mash inlet valve is faulty. → Error code: E105
- The boil pump is clogged. → Error code: E105
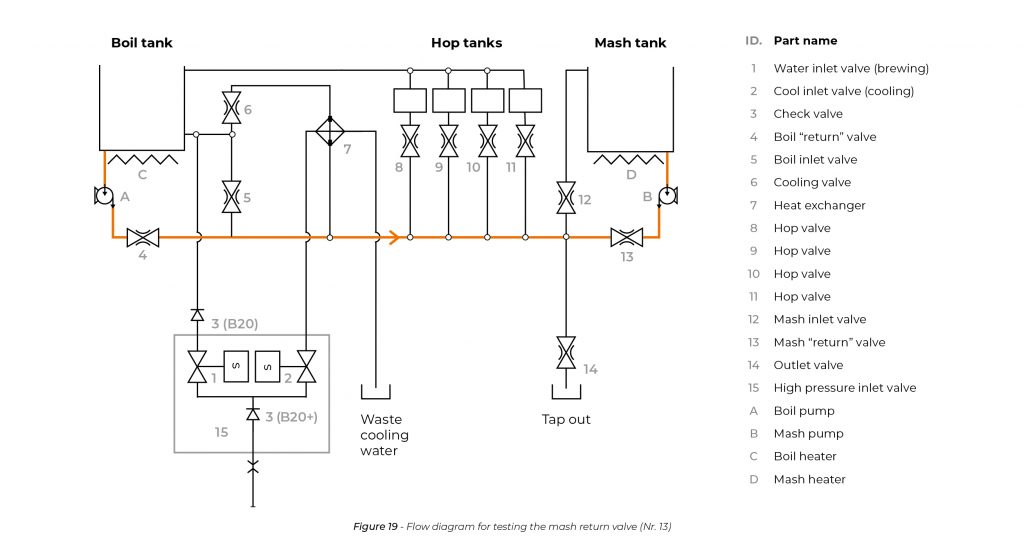
6.4. Testing the mash return valve
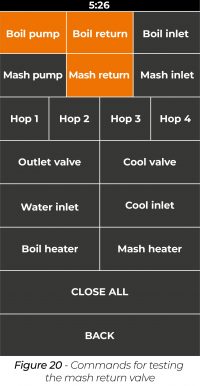
This step checks the mash return valve (Figure 19 – Flow diagram for testing the mash return valve). The water is pumped by the boil pump (“A” pump) through the boil return valve (Nr. 4) to the mash return valve (Nr. 4) and mash pump (“B” pump).
After clicking on the “Boil pump”, “Boil return” and “Mash inlet” commands () the machine should transfer water through the bottom orifice of the boil tank to the mash tank using its bottom orifice.
If nothing happens, or the water flow is too weak, the following problems could have occurred:
- The inner side of the silicone tube is stuck together.
- The mash return valve does not receive electric power. → Check the cables of the given valve.
- The mash return valve is faulty.
- The mash pump is clogged.
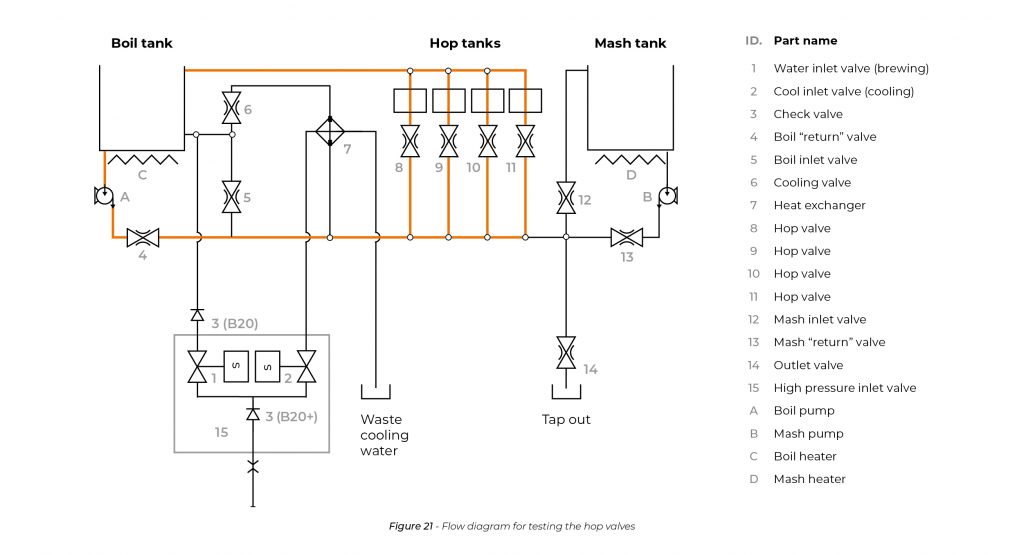
7. Testing the hop valves
This step checks the hop cage valves (Figure 21 – Flow diagram for testing the hop valves). The water is pumped by the boil pump (“A” pump) through the boil return valve (Nr. 4) to the hop tanks where the hop valves (Nr. 8-9-10-11) are located on the pipeline.
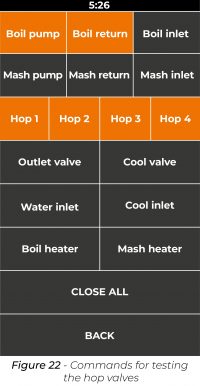
After clicking on the “Boil pump”, “Boil return”, “Hop 1”, “Hop 2”, “Hop 3” and “Hop 4” commands (Figure 22 – Commands for testing the hop valves) the machine should transfer water through the bottom orifice of the boil tank to the hop cages where the water should overflow back to the boil tank. The water flow should be evenly distributed between the hop cages.
Alternative method for testing the hop valves
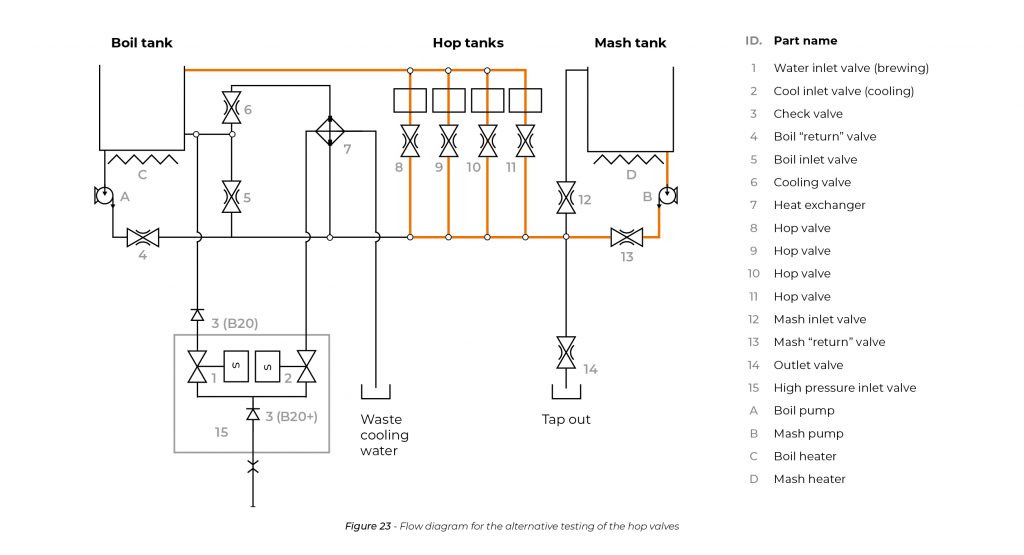
If during Step 4. – Water circulation on the boiling side any error was encountered, the hop tank valves may be checked in an alternative way (Figure 23 – Flow diagram for the alternative testing of the hop valves). In this method the water is pumped by the mash pump (“B” pump) through the mash return valve (Nr. 13) to the hop tanks where the hop valves (Nr. 8-9-10-11) are located on the pipeline.
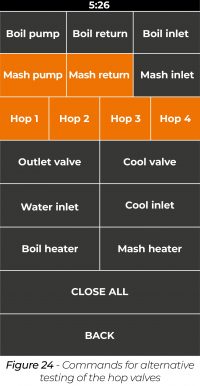
After clicking on the “Mash pump”, “Mash return”, “Hop 1”, “Hop 2”, “Hop 3” and “Hop 4” commands (Figure 24 – Commands for alternative testing of the hop valves) the machine should transfer water through the bottom orifice of the mash tank to the hop cages where the water should overflow to the boil tank. The water flow should be evenly distributed between the hop cages.
If the water does not fill one or more of the hop cages, the following errors could have occurred:
- The silicon tube under the given hop tank valve is stuck together.
- The given hop cage valve does not receive electric power. → Check the cables of the given valve.
The given hop cage valve is broken.
8. Testing the cool valve
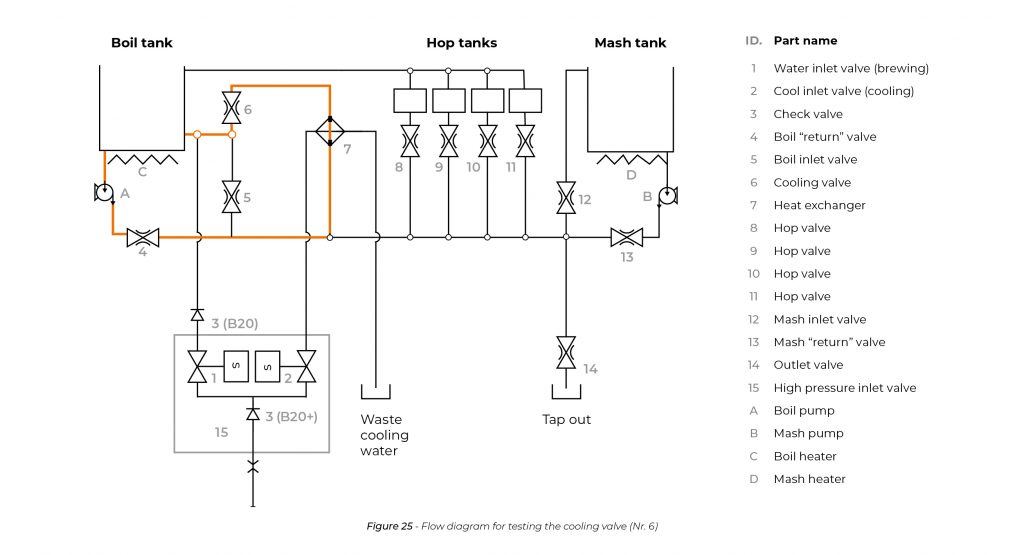
This step checks the cool valve which is located at the heat exchanger (Figure 25 – Flow diagram for testing the cool valve). The water is pumped by the boil pump (“A” pump) through the boil return valve (Nr. 4) to the heat exchanger (Nr. 7) where the cool valve (Nr. 6) is located downstream the pipeline.
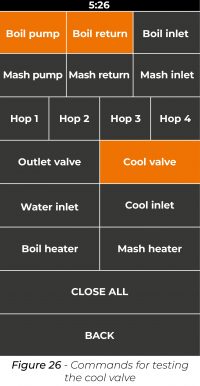
After clicking on the “Boil pump”, “Boil return” and “Cool valve” commands (Figure 26 – Commands for testing the cool valveFigure 24 – Commands for alternative testing of the hop valves) the machine should transfer water through the bottom orifice of the boil tank in the direction of the heat exchanger, the water should enter the boil tank through the side orifice (same as in case of boil inlet valve testing).
Alternative method for testing the cool valve
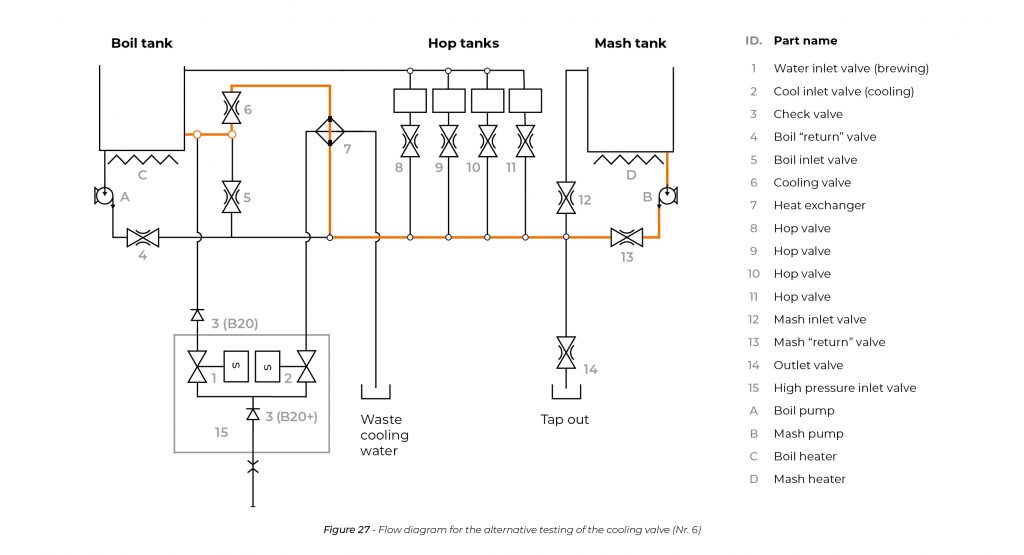
If during Step 4. – Water circulation on the boiling side any error was encountered, the cooling valve may be checked in an alternative way (Figure 27 – Flow diagram for the alternative testing of the cool valve). In this method the water is pumped by the mash pump (“B” pump) through the mash return valve (Nr. 13) to the heat exchanger (Nr. 7) where the cool valve (Nr. 6) is located downstream the pipeline.
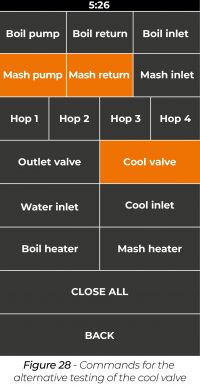
After clicking on the “Mash pump”, “Mash return” and “Cool valve” commands (Figure 28 – Commands for the alternative testing of the cool valveFigure 24 – Commands for alternative testing of the hop valves) the machine should transfer water through the bottom orifice of the mash tank in the direction of the heat exchanger, the water should enter the boil tank through the side orifice (same as in case of boil inlet valve testing).
If water doesn’t circulate in the boiling tank, the following errors could have occurred:
- The silicon tube under the given hop tank valve is stuck together.
- The cool valve does not receive electric power. → Check the cables of the given valve.
- The cool valve is faulty.
9. The boil heater
IMPORTANT! It is important to pour/fill water in the boil tank before testing the heater, otherwise the bottom of the tank can be easily burned. There is no built-in software routine check which would prevent the damage to the machine.
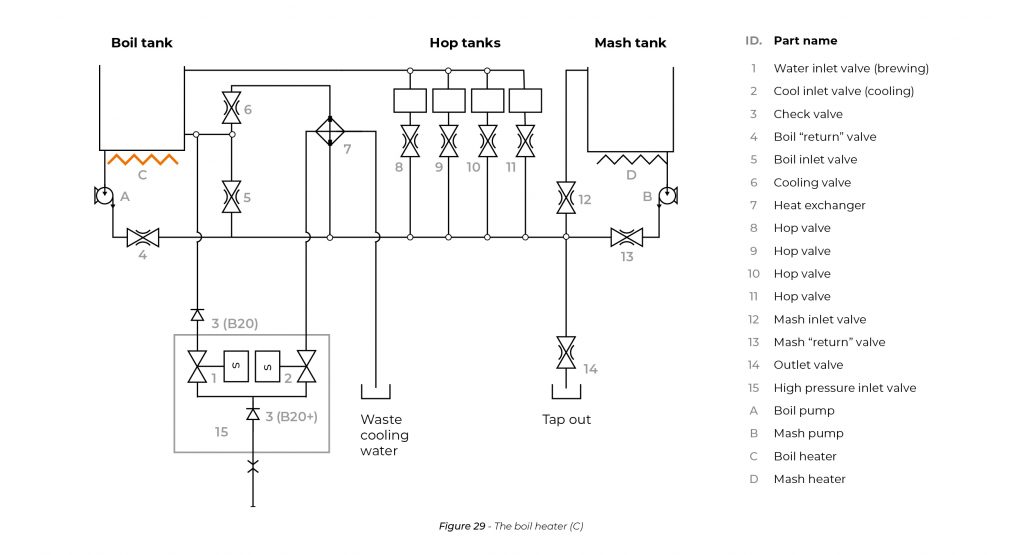
During this process, the boil heater is being tested which is located right under the boil tank (Figure 29 – The boil heater).
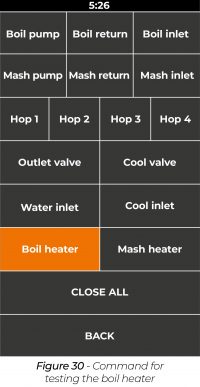
After clicking on the “Boil heater” command (Figure 30 – Command for testing the boil heater) the machine should start to operate the boil heater immediately. Using a power meter it has to be checked that the machine takes up the necessary amount of electricity (cca. 1150-1800 W).
If the boil heater does not consume electric power, the following errors could have occurred:
- The cable of the heater is faulty. → Check the cable of the given heater.
- The boil heater is faulty.
If the machine switches off randomly or cuts its own power, or interrupts the electric system of the house, a short circuit happened.
10. The mash heater
IMPORTANT! It is important to pour/fill water in the mash tank before testing the heater, otherwise the bottom of the tank can be easily burned. There is no built-in software routine check which would prevent the damage to the machine.
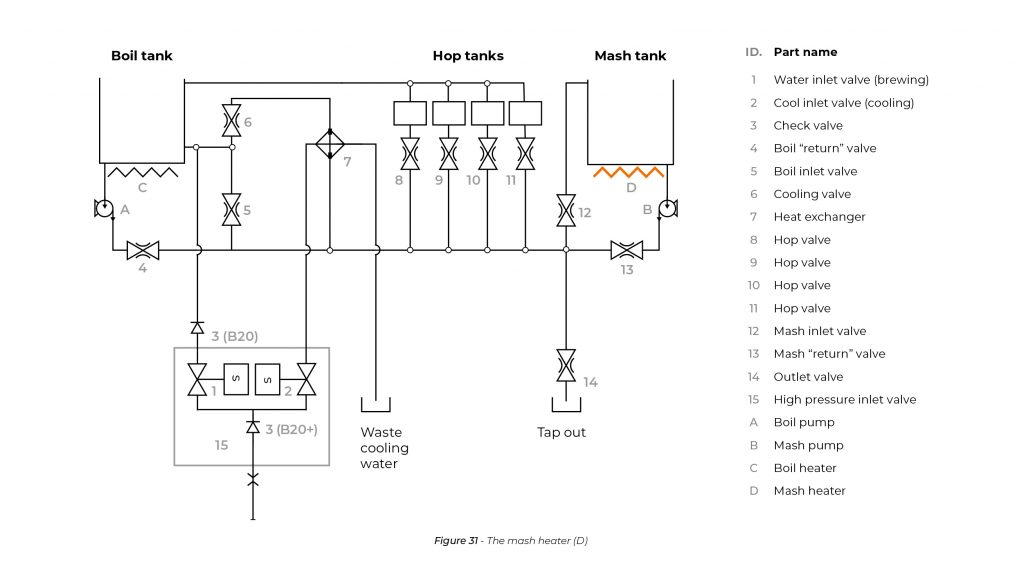
During this process, the mash heater is being tested which is located right under the mash tank (Figure 31 – The mash heaterFigure 29 – The boil heater).
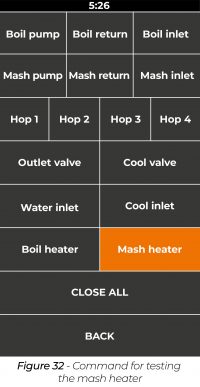
After clicking on the “Mash heater” command (Figure 32 – Command for testing the mash heater) the machine should start to operate the mash heater immediately. Using a power meter it has to be checked that the machine takes up the necessary amount of electricity (cca. 1150-1800 W).
If the mash heater does not consume electric power, the following errors could have occurred:
- The cable of the heater is faulty → Check the cable of the given heater.
- The mash heater is broken.
If the machine switches of randomly or cuts its own power, or interrupts the electric system of the house, a short circuit happened.
11. Testing the outlet valve
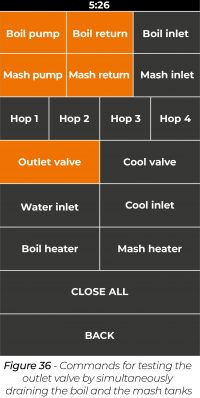
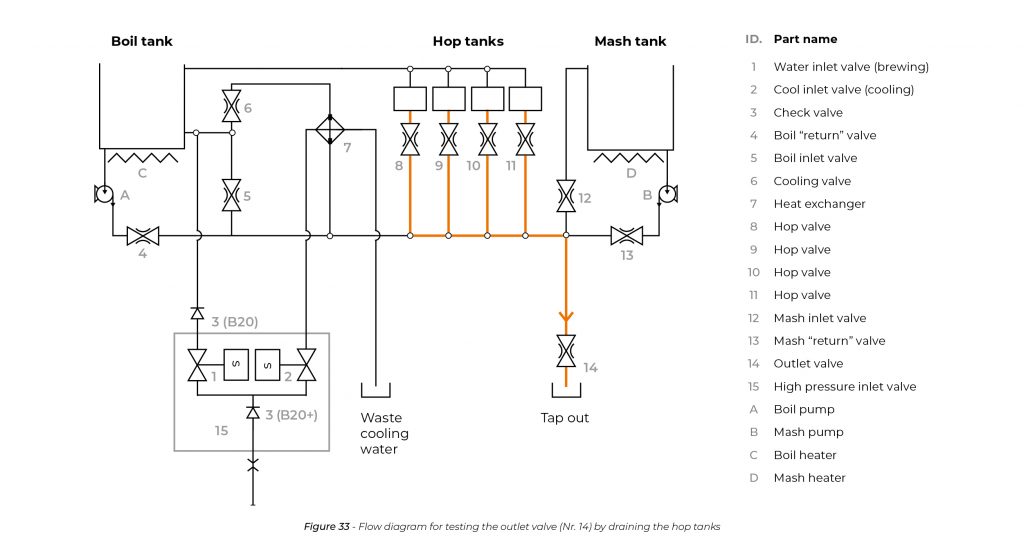
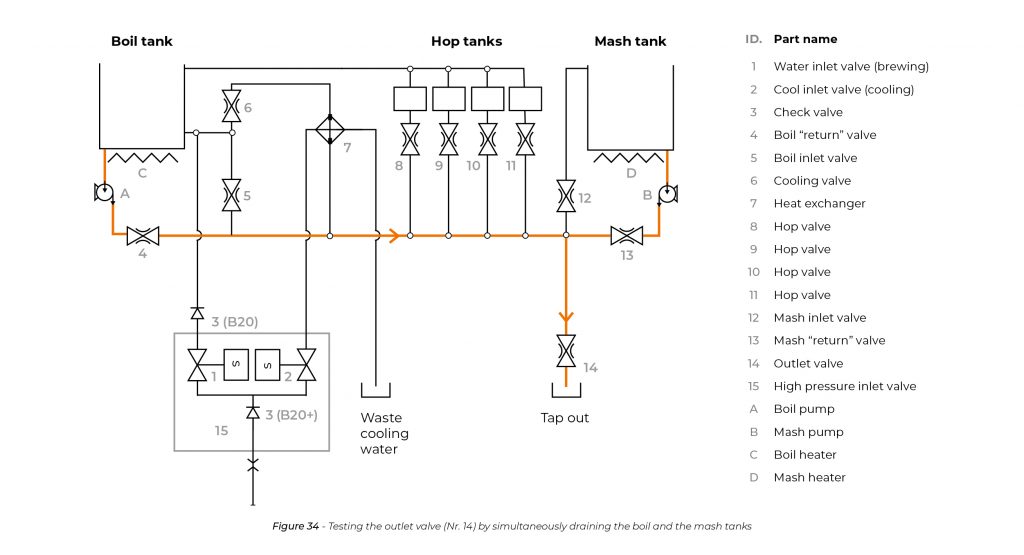
During this process the outlet valve (Nr. 14) is being tested by draining the machine after the “Next Step” Test. First the hop tanks are drained (Figure 33 – Flow diagram for testing the outlet valve by draining the hop tanks), followed by the simultaneous draining of the boil and the mash tanks (Figure 34 – Testing the outlet valve by simultaneously draining the boil and the mash tanks).
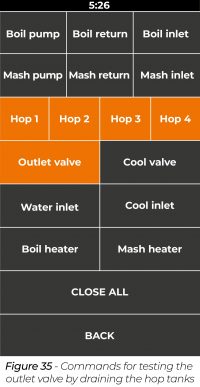
The draining process consists of 2 steps. Step1: After clicking on the “Hop 1”, “Hop 2” “Hop 3”, “Hop 4” and “Outlet valve” commands (Figure 35 – Commands for testing the outlet valve by draining the hop tanksFigure 24 – Commands for alternative testing of the hop valves) the water should flow out of the hop tanks by gravity. The drained water should exit the machine through the rear outlet silicone pipe which is closer to the side of the machine. After draining the hop valves has to closed.
Step 2: After clicking on the “Boil pump”, “Boil return” “Mash pump”, “Mash return” and “Outlet valve” commands (Figure 36 – Commands for testing the outlet valve by simultaneously draining the boil and the mash tanksFigure 24 – Commands for alternative testing of the hop valves) the water should be pumped out of the boil and the mash tanks. The drained water should exit the machine through the rear outlet silicone pipe which is closer to the side of the machine.
In case an error occurred during one of the steps, most probably the water will not leave the given cages, tanks. Should this happen, the water should be removed manually, by applying the “communicating vessels theory”.
If the water does not leave through the outlet valve, the following errors could have occurred:
- The silicon tube under the outlet valve is stuck together.
- The outlet valve does not receive electric power. → Check the cables of the given valve.
- The outlet valve is faulty.
